Logistic regression

CSI 4106 - Fall 2026

Marcel Turcotte

Version: Sep 23, 2026 10:14

Preamble

Message of the Day

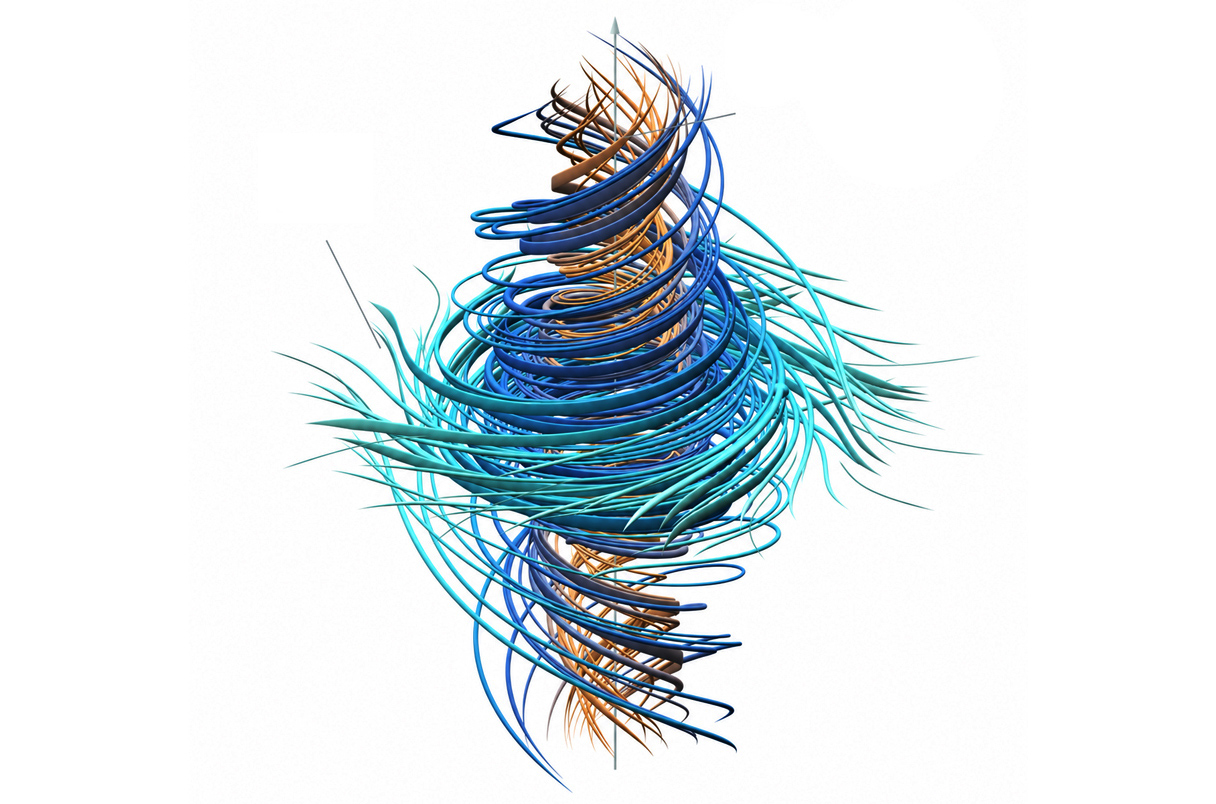
A conceptual illustration of a vortex in OpenAI's claimed Navier–Stokes solution.

Learning Objectives

  • Distinguish binary, multiclass, and multilabel classification tasks.
  • Explain how logistic regression converts a linear score into a probability using the sigmoid function.
  • Relate the 0.5 classification threshold to the linear decision boundary.
  • Explain how one-vs-rest extends a binary classifier to multiclass problems.
  • Train a logistic regression model without leaking information from the test set.
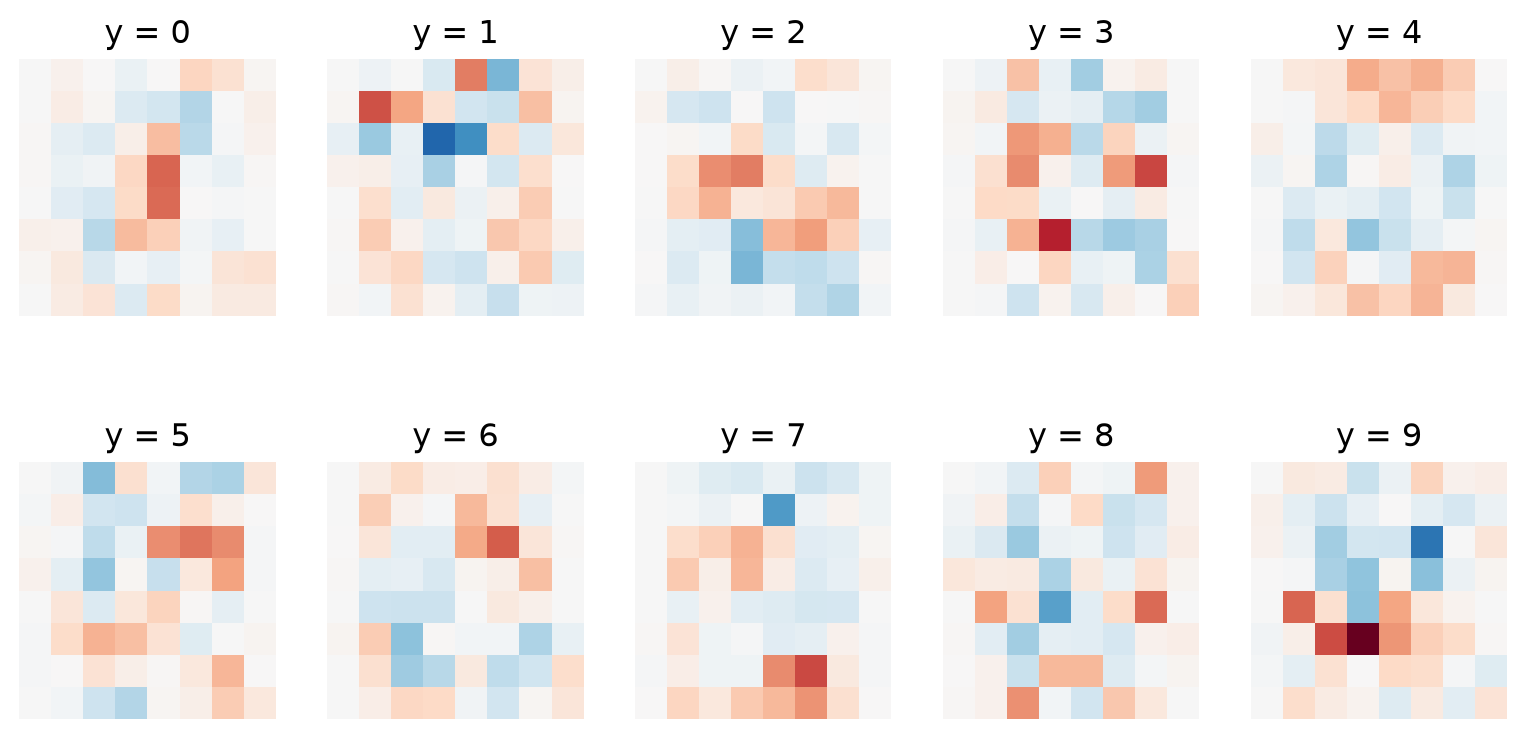
  • Interpret the coefficients learned by one-vs-rest digit classifiers.

Classification tasks

Definitions

  • Binary classification is a supervised learning task where the objective is to categorize instances (examples) into one of two discrete classes.

  • A multiclass classification task is a supervised learning problem where the objective is to categorize instances into one of three or more discrete classes.

Binary classification

  • Some machine learning algorithms are specifically designed to solve binary classification problems.
    • Logistic regression and support vector machines (SVMs) are such examples.

Multiclass classification

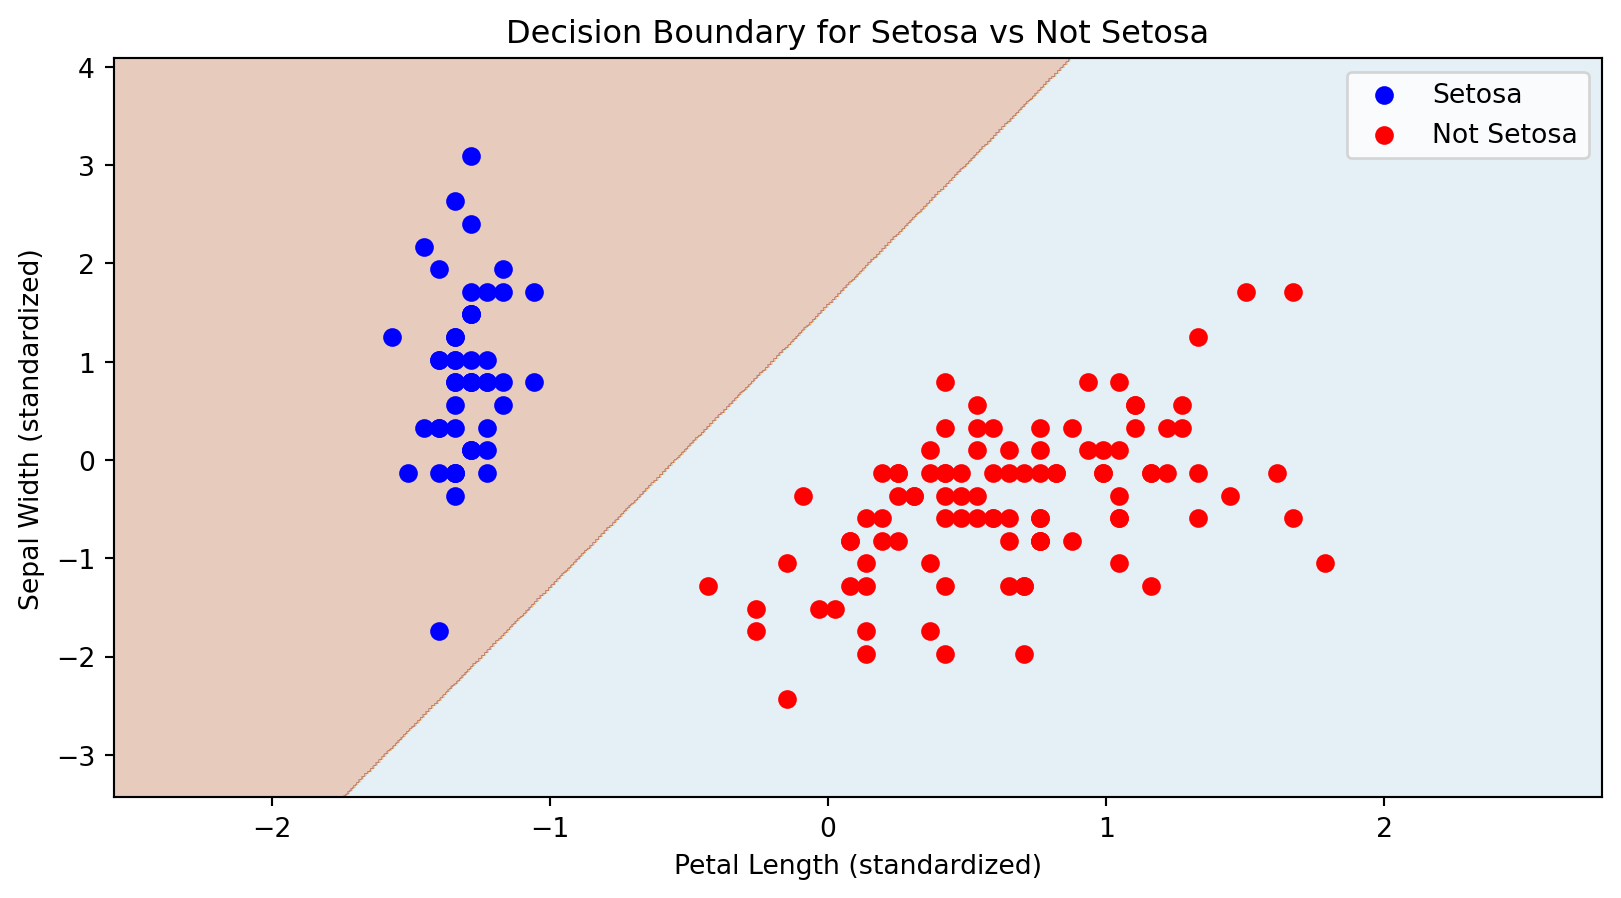
  • A multiclass classification problem can be approached as a collection of binary classification tasks.
  • One-vs-Rest (OvR)
    • A separate binary classifier is trained for each class.
    • For each classifier, one class is treated as the positive class, and all other classes are treated as the negative class.
    • The final assignment selects the class whose classifier produces the largest score for a given input.

Logistic Regression

Data and Problem

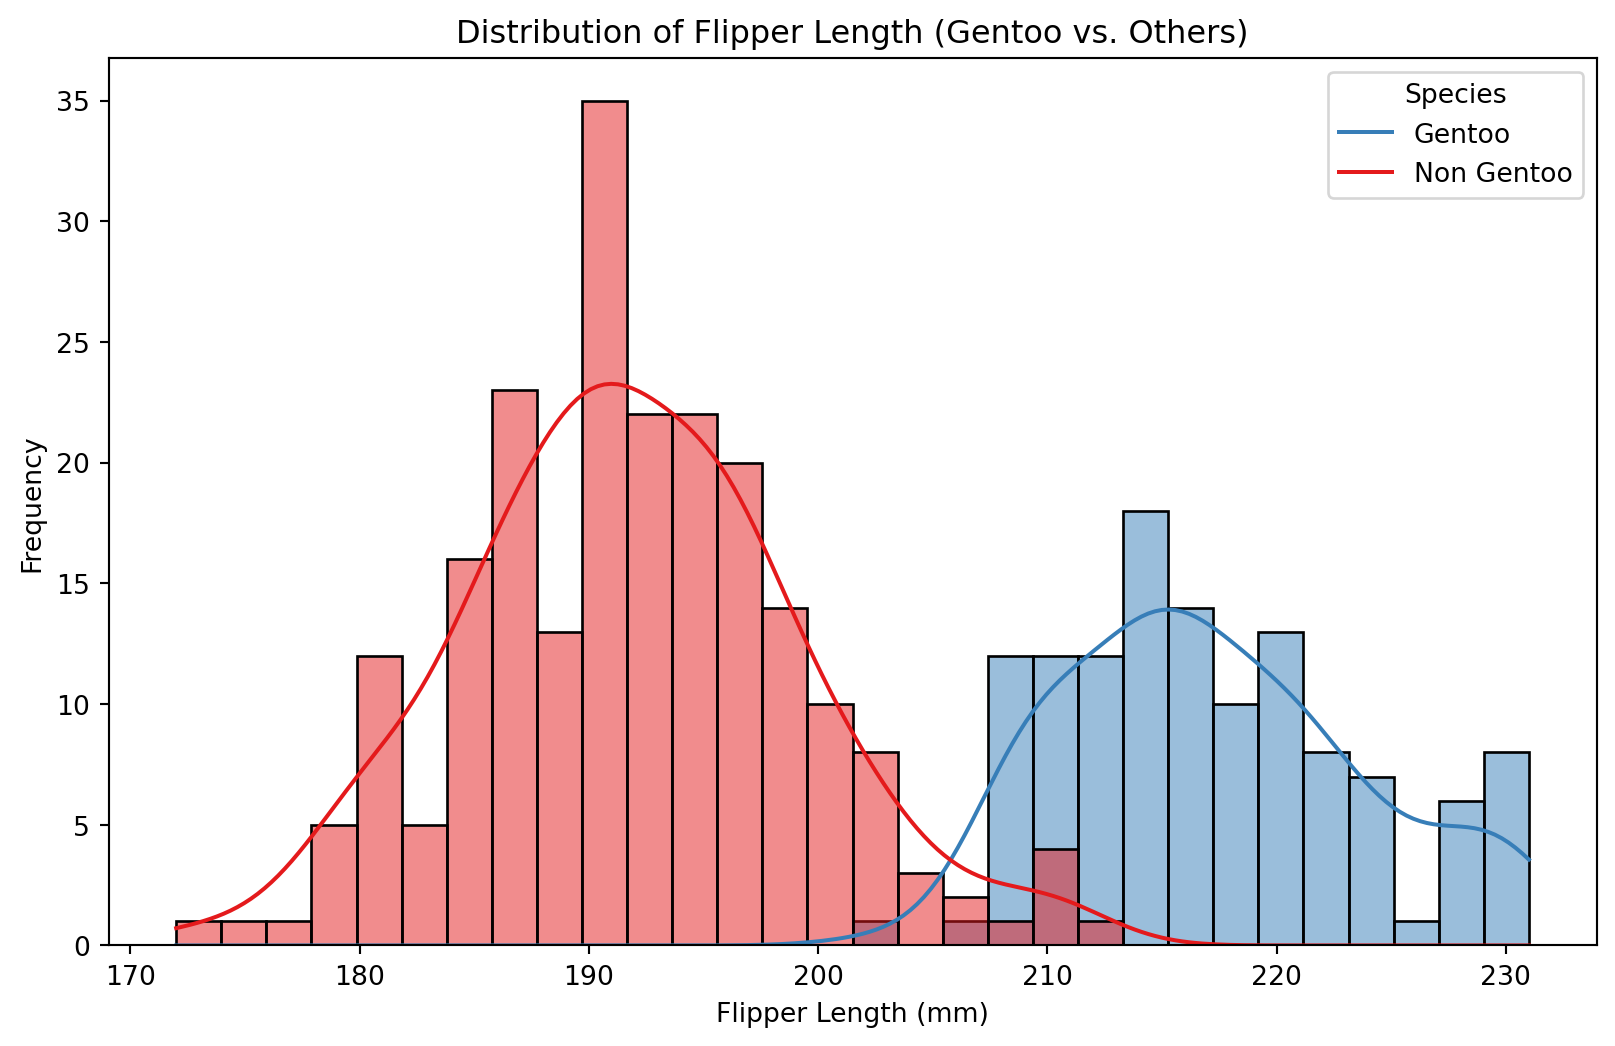
  • Dataset: Palmer Penguins
  • Task: Binary classification to distinguish Gentoo penguins from non-Gentoo species
  • Feature of Interest: Flipper length

Histogram

Code
import numpy as np
import pandas as pd
import matplotlib.pyplot as plt
import seaborn as sns
from palmerpenguins import load_penguins
from sklearn.datasets import load_digits, load_iris
from sklearn.linear_model import LinearRegression, LogisticRegression
from sklearn.metrics import accuracy_score
from sklearn.model_selection import train_test_split
from sklearn.multiclass import OneVsRestClassifier
from sklearn.pipeline import make_pipeline
from sklearn.preprocessing import StandardScaler, label_binarize

# Load the Palmer Penguins dataset
penguin_df = load_penguins()[['flipper_length_mm', 'species']].dropna().copy()

# Create a binary label: 1 if Gentoo, 0 otherwise
penguin_df['is_gentoo'] = (penguin_df['species'] == 'Gentoo').astype(int)
penguin_df['class_name'] = np.where(
    penguin_df['is_gentoo'] == 1,
    'Gentoo',
    'Not Gentoo'
)

# Use the same colours for the two classes in every figure.
not_gentoo_color = 'tab:red'   # y = 0
gentoo_color = 'tab:blue'      # y = 1
model_color = 'black'

# Separate features (X) and labels (y)
penguin_X = penguin_df[['flipper_length_mm']]
penguin_y = penguin_df['is_gentoo']

# Plot the distribution of flipper lengths by binary species label
plt.figure(figsize=(10, 6))
sns.histplot(
    data=penguin_df,
    x='flipper_length_mm',
    hue='class_name',
    hue_order=['Not Gentoo', 'Gentoo'],
    kde=True,
    bins=30,
    palette={
        'Not Gentoo': not_gentoo_color,
        'Gentoo': gentoo_color,
    }
)
plt.title('Distribution of Flipper Length (Gentoo vs. Others)')
plt.xlabel('Flipper Length (mm)')
plt.ylabel('Frequency')
plt.show()
Logistic (Logit) Regression

  • Despite its name, logistic regression serves as a classification algorithm rather than a regression technique.

  • The labels in logistic regression are binary values, denoted as y_i \in \{0,1\}, making it a binary classification task.

  • The primary objective of logistic regression is to determine the probability that a given instance x_i belongs to the positive class, i.e., y_i = 1.

Model

  • General Case: P(y = k | x, \theta), where k is a class label.
  • Binary Case: y \in \{0,1\}
    • Predict P(y = 1 | x, \theta)

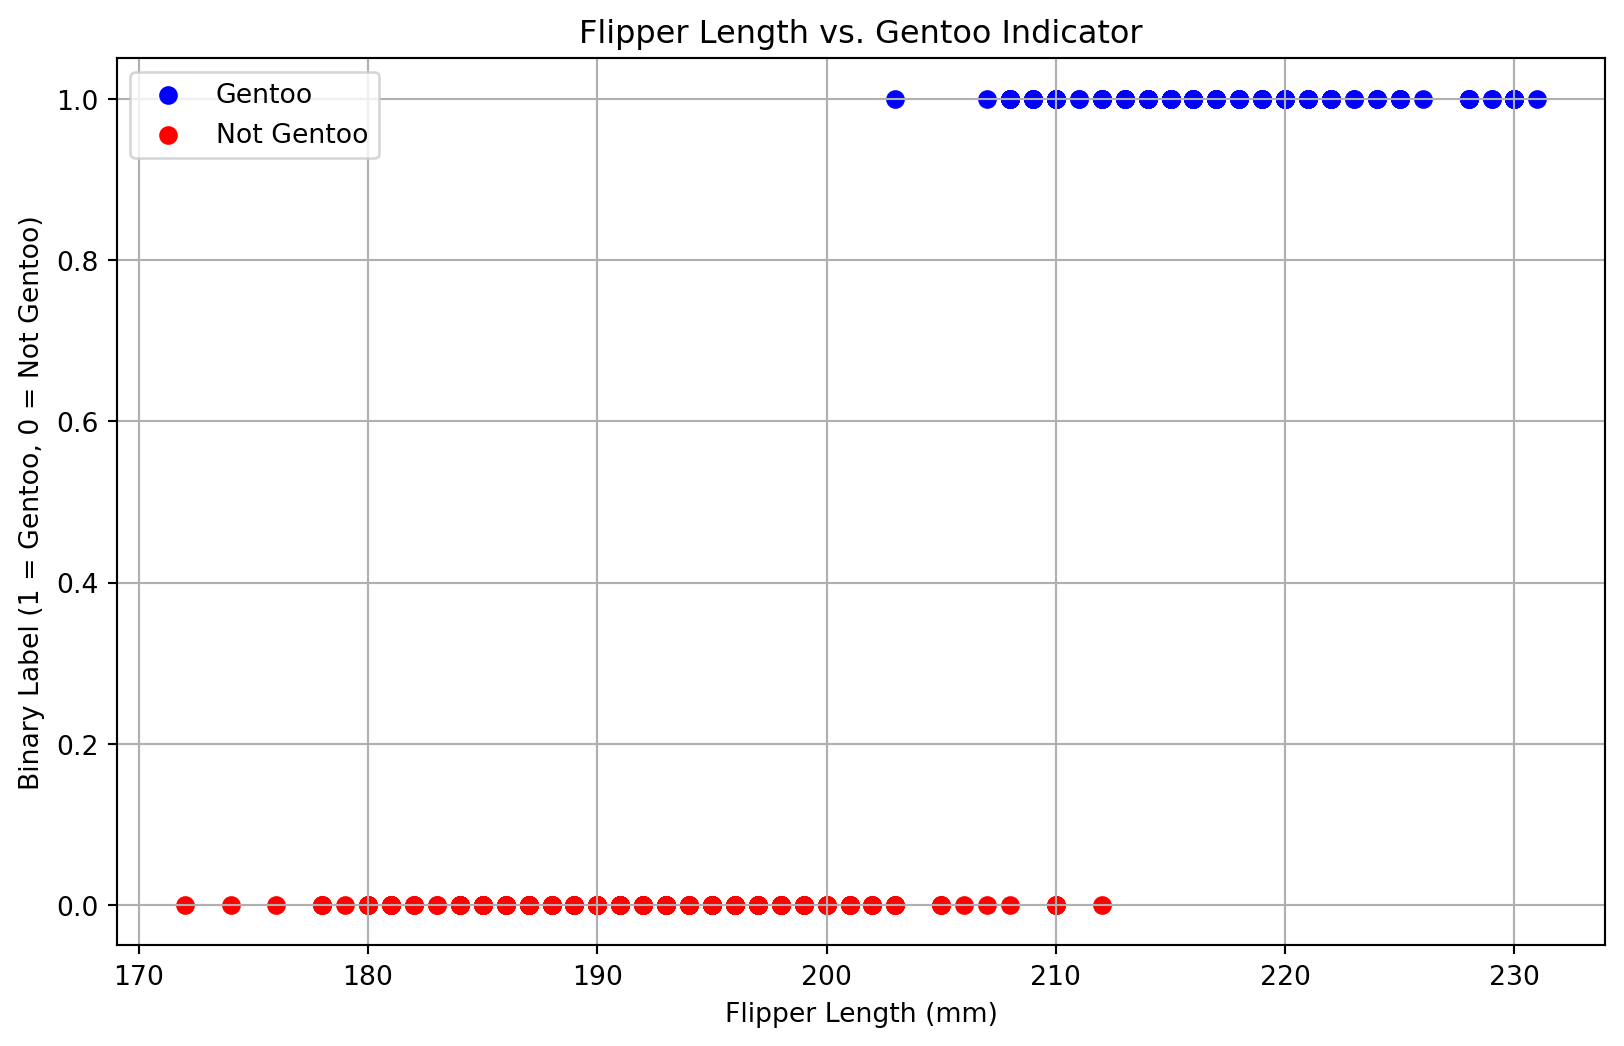
Visualizing our data

Code
# Scatter plot of flipper length vs. binary label (Gentoo or Not Gentoo)
plt.figure(figsize=(10, 6))

# Plot points labeled as Gentoo (is_gentoo = 1)
plt.scatter(
    penguin_df.loc[penguin_df['is_gentoo'] == 1, 'flipper_length_mm'],
    penguin_df.loc[penguin_df['is_gentoo'] == 1, 'is_gentoo'],
    color=gentoo_color,
    label='Gentoo'
)

# Plot points labeled as Not Gentoo (is_gentoo = 0)
plt.scatter(
    penguin_df.loc[penguin_df['is_gentoo'] == 0, 'flipper_length_mm'],
    penguin_df.loc[penguin_df['is_gentoo'] == 0, 'is_gentoo'],
    color=not_gentoo_color,
    label='Not Gentoo'
)

plt.title('Flipper Length vs. Gentoo Indicator')
plt.xlabel('Flipper Length (mm)')
plt.ylabel('Binary Label (1 = Gentoo, 0 = Not Gentoo)')
plt.legend(loc='best')
plt.grid(True)
plt.show()

Intuition

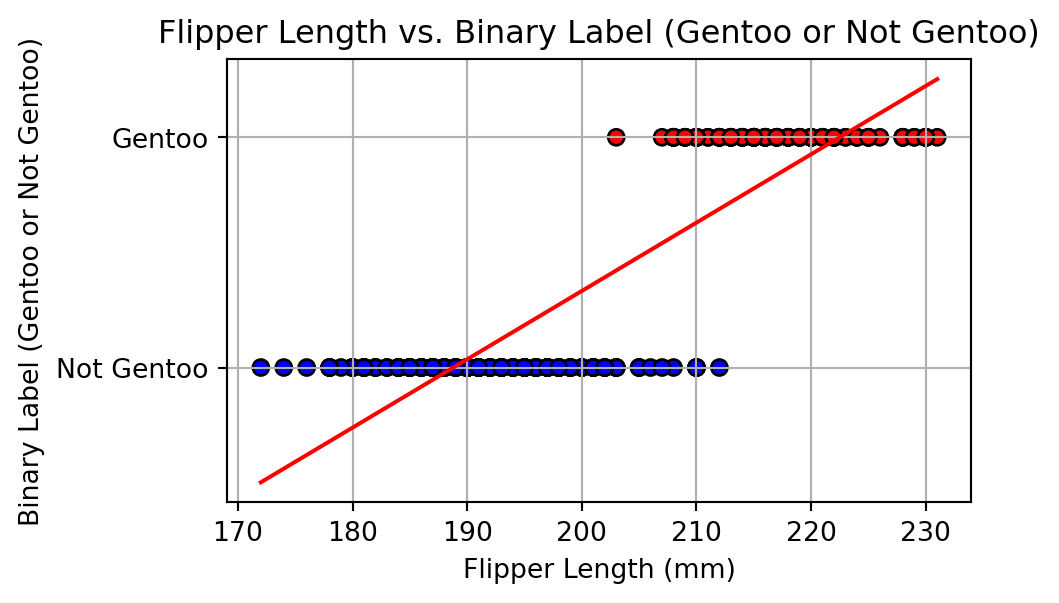
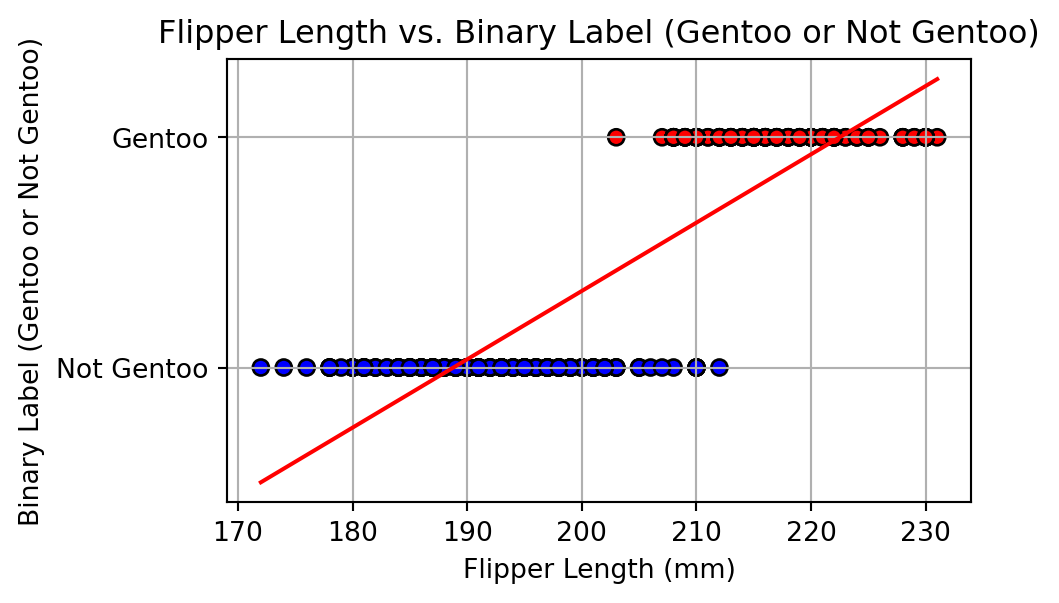
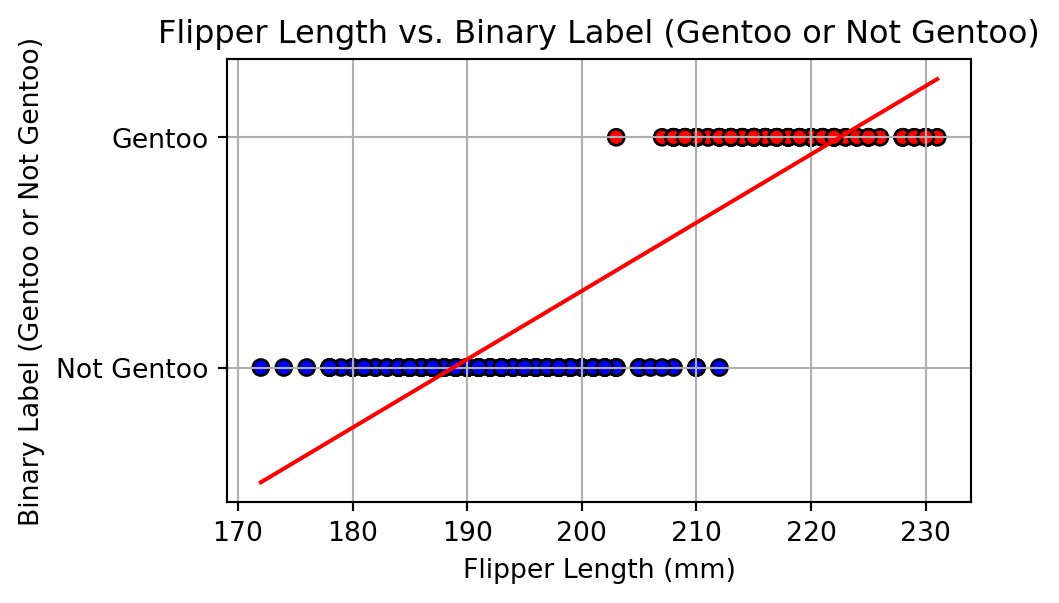
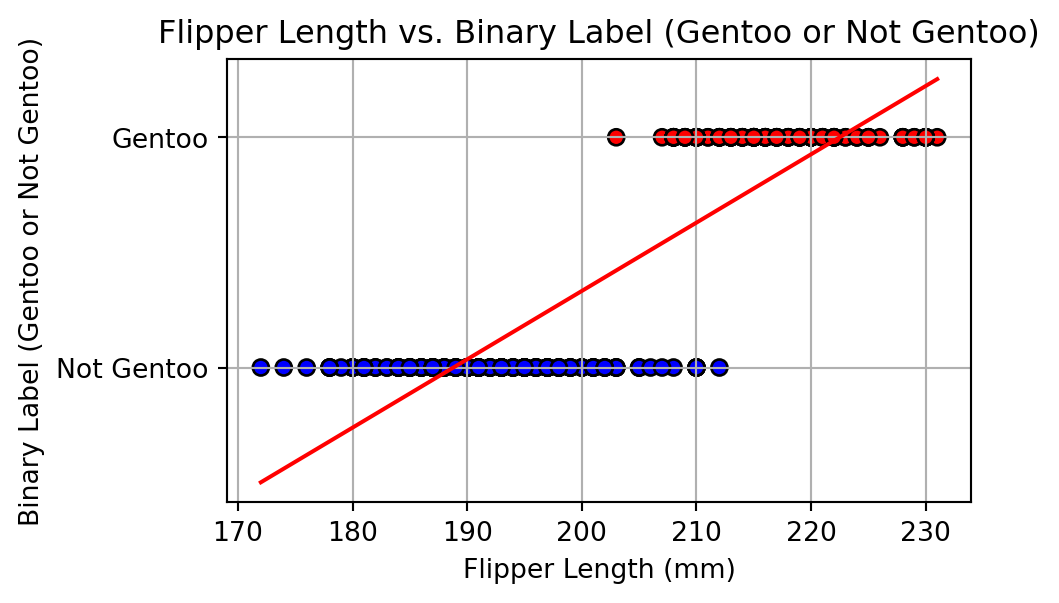
Fitting a linear regression is not the answer, but \ldots

Code
penguin_linear_model = LinearRegression()
penguin_linear_model.fit(penguin_X, penguin_y)

penguin_line_X = pd.DataFrame({
    'flipper_length_mm': np.linspace(
        penguin_X['flipper_length_mm'].min(),
        penguin_X['flipper_length_mm'].max(),
        200
    )
})
penguin_line_y = penguin_linear_model.predict(penguin_line_X)

# The threshold is where the fitted line reaches 0.5.
linear_boundary_mm = float(
    (0.5 - penguin_linear_model.intercept_) /
    penguin_linear_model.coef_[0]
)

def plot_penguin_linear_fit():
    plt.figure(figsize=(5, 3))
    plt.scatter(
        penguin_X['flipper_length_mm'],
        penguin_y,
        color=np.where(
            penguin_y == 1,
            gentoo_color,
            not_gentoo_color,
        ),
        edgecolor='k'
    )
    plt.plot(
        penguin_line_X['flipper_length_mm'],
        penguin_line_y,
        color=model_color,
    )
    plt.axhline(0.5, color='gray', linestyle='--', linewidth=1)
    plt.axvline(linear_boundary_mm, color='gray', linestyle=':', linewidth=1)
    plt.xlabel('Flipper Length (mm)')
    plt.ylabel('Model output')
    plt.yticks([0, 0.5, 1], ['Not Gentoo', 'Threshold', 'Gentoo'])
    plt.grid(True)
    plt.show()

plot_penguin_linear_fit()

Code
plot_penguin_linear_fit()

Intuition (continued)

Code
plot_penguin_linear_fit()

  • A high flipper_length_mm typically results in a model output approaching 1.

  • Conversely, a low flipper_length_mm generally yields a model output near 0.

  • Notably, the model outputs are not confined to the [0, 1] interval and may occasionally fall below 0 or surpass 1.

Intuition (continued)

Code
plot_penguin_linear_fit()

  • For a single feature, the decision boundary is a specific point.
  • In this case, the fitted line reaches the 0.5 threshold at approximately 205.6 mm.

Intuition (continued)

Code
plot_penguin_linear_fit()

  • As flipper_length_mm increases above the threshold, the fitted output moves toward the Gentoo label.
  • As flipper_length_mm decreases below the threshold, the fitted output moves toward the non-Gentoo label.

Intuition (continued)

Code
plot_penguin_linear_fit()

  • Near the threshold, the fitted output is close to 0.5, but linear regression still does not produce a valid probability model.

Logistic Function

Code
def sigmoid(t):
    return 1 / (1 + np.exp(-t))

sigmoid_input = np.linspace(-6, 6, 1000)
sigmoid_output = sigmoid(sigmoid_input)

# Fit a one-feature logistic regression model so that we can distinguish
# its linear score from the probability obtained after applying the sigmoid.
penguin_logistic_model = LogisticRegression(max_iter=1000)
penguin_logistic_model.fit(penguin_X, penguin_y)

penguin_line_score = penguin_logistic_model.decision_function(penguin_line_X)
logistic_boundary_mm = float(
    -penguin_logistic_model.intercept_[0] /
    penguin_logistic_model.coef_[0, 0]
)

def plot_penguin_logistic_score():
    plt.figure(figsize=(5, 3))
    plt.plot(
        penguin_line_X['flipper_length_mm'],
        penguin_line_score,
        color=model_color,
        linewidth=2
    )
    plt.axhline(0, color='gray', linestyle='--', linewidth=1)
    plt.axvline(logistic_boundary_mm, color='gray', linestyle=':', linewidth=1)
    plt.scatter([logistic_boundary_mm], [0], color='black', zorder=3)
    plt.xlabel('Flipper Length (mm)')
    plt.ylabel(r'Linear score $t(x)$')
    plt.grid(True)
    plt.show()

def plot_sigmoid():
    fig, ax = plt.subplots(figsize=(6, 4))
    ax.plot(sigmoid_input, sigmoid_output, color=model_color, linewidth=2)
    ax.axvline(x=0, color='black', linewidth=1)
    ax.axhline(y=0.5, color='gray', linestyle='--', linewidth=1)
    ax.scatter([0], [0.5], color='black', zorder=3)
    ax.set_yticks([0, 0.5, 1.0])
    ax.set_xlabel('t')
    ax.set_ylabel(r'$\sigma(t)$')
    ax.grid(True)
    plt.show()

plot_sigmoid()
Code
plot_sigmoid()

Logistic Function

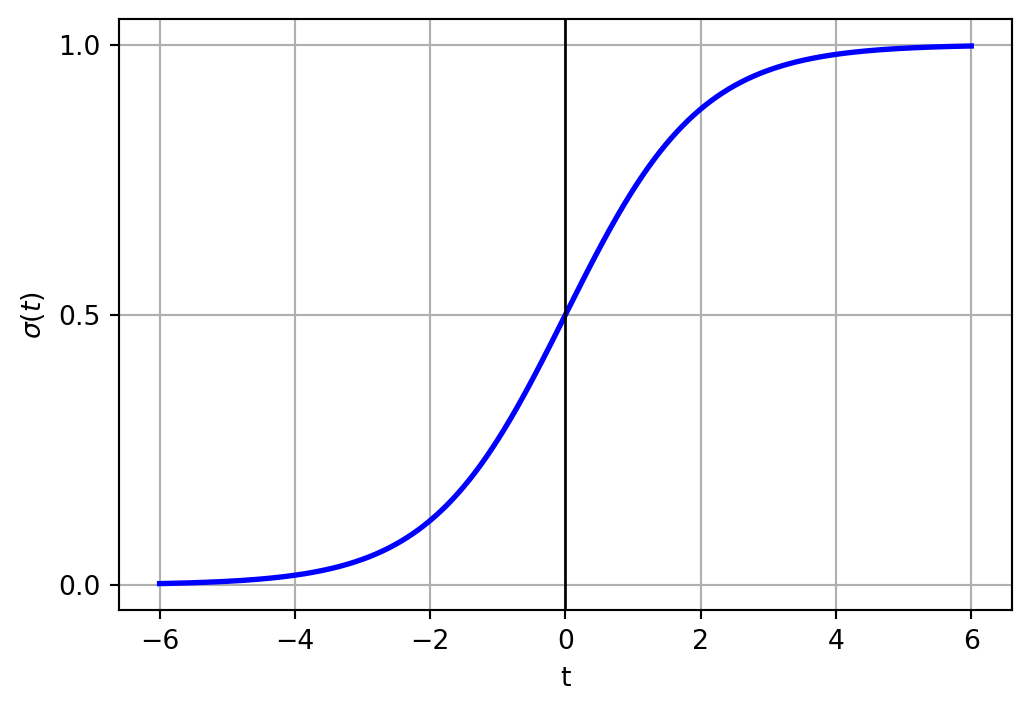
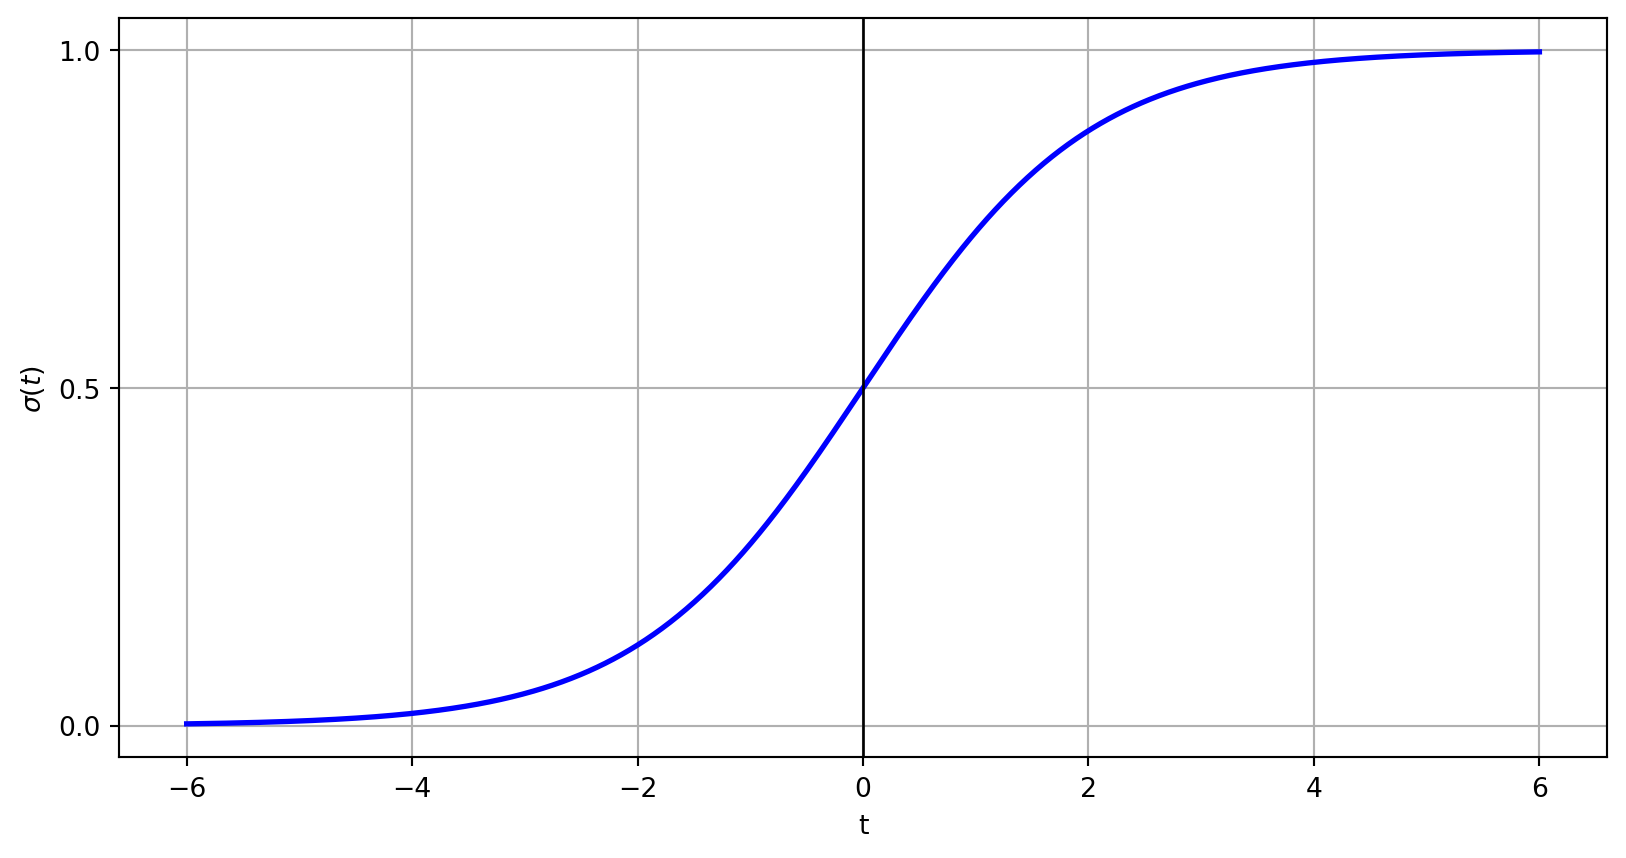
In mathematics, the standard logistic function maps a real-valued input from \mathbb{R} to the open interval (0,1). The function is defined as:

\sigma(t) = \frac{1}{1+e^{-t}}

Code
plot_sigmoid()

Linear score and probability

Code
plot_penguin_logistic_score()

Code
plot_sigmoid()

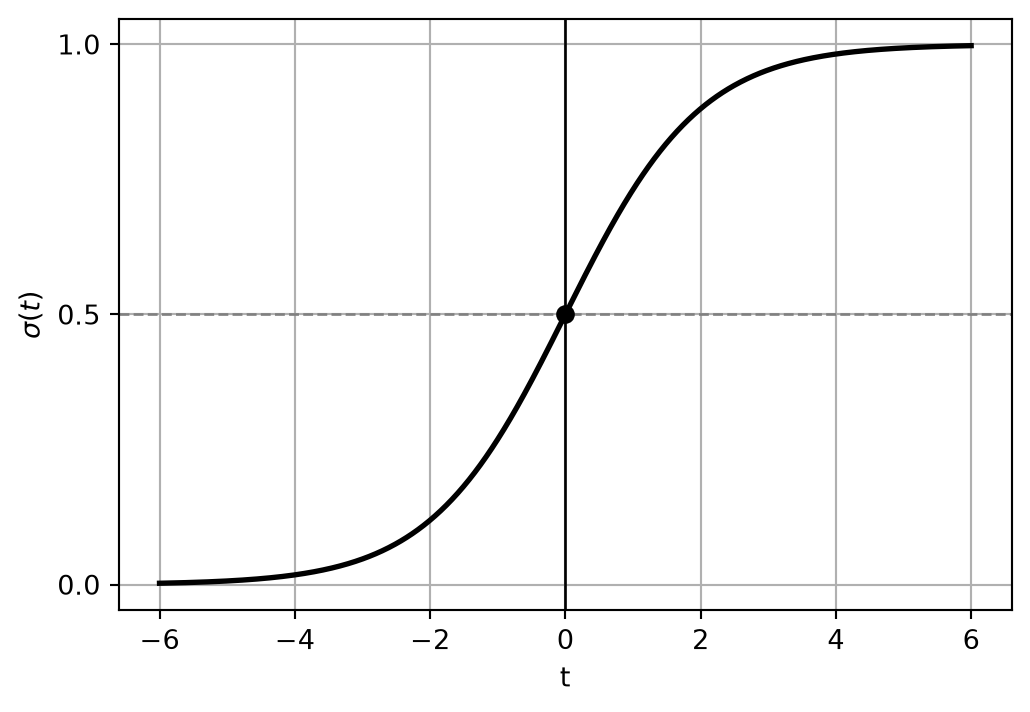
  • The fitted linear score t(x)=\theta_0+\theta_1x is zero at the decision boundary, approximately 207 mm in this example.
  • The sigmoid maps this zero score to P(y=1\mid x)=0.5. Negative scores map below 0.5, and positive scores map above 0.5.

Logistic function

An S-shaped curve, such as the standard logistic function (aka sigmoid), is termed a squashing function because it maps a wide input domain to a constrained output range.

\sigma(t) = \frac{1}{1+e^{-t}}

Code
plot_sigmoid()

Logistic (Logit) Regression

  • Analogous to linear regression, logistic regression computes a weighted sum of the input features, expressed as: \theta_0 + \theta_1 x_i^{(1)} + \theta_2 x_i^{(2)} + \ldots + \theta_D x_i^{(D)}

  • However, using the sigmoid function limits its output to the range (0,1): \sigma(\theta_0 + \theta_1 x_i^{(1)} + \theta_2 x_i^{(2)} + \ldots + \theta_D x_i^{(D)})

Notation

  • Equation for the logistic regression: \sigma(\theta_0 + \theta_1 x_i^{(1)} + \theta_2 x_i^{(2)} + \ldots + \theta_D x_i^{(D)})

  • Multiplying \theta_0 (intercept/bias) by 1: \sigma(\theta_0 \times 1 + \theta_1 x_i^{(1)} + \theta_2 x_i^{(2)} + \ldots + \theta_D x_i^{(D)})

  • Multiplying \theta_0 by x_i^{(0)} = 1: \sigma(\theta_0 x_i^{(0)} + \theta_1 x_i^{(1)} + \theta_2 x_i^{(2)} + \ldots + \theta_D x_i^{(D)})

Logistic regression

The Logistic Regression model, in its vectorized form, is defined as:

h_\theta(x_i) = \sigma(\theta^\top x_i) = \frac{1}{1+e^{-\theta^\top x_i}}

Code
penguin_features = ['bill_depth_mm', 'body_mass_g']
penguin_two_feature_df = load_penguins()[penguin_features + ['species']].dropna().copy()
penguin_two_feature_df['is_gentoo'] = (
    penguin_two_feature_df['species'] == 'Gentoo'
).astype(int)

penguin_two_X = penguin_two_feature_df[penguin_features].to_numpy()
penguin_two_y = penguin_two_feature_df['is_gentoo'].to_numpy()

penguin_two_X_train, penguin_two_X_test, penguin_two_y_train, penguin_two_y_test = train_test_split(
    penguin_two_X,
    penguin_two_y,
    test_size=0.2,
    random_state=42,
    stratify=penguin_two_y
)

penguin_two_model = make_pipeline(
    StandardScaler(),
    LogisticRegression(max_iter=1000)
)
penguin_two_model.fit(penguin_two_X_train, penguin_two_y_train)

def plot_penguin_decision_boundary(X_values, y_values, fitted_model):
    bill_depth = np.linspace(X_values[:, 0].min() - 1, X_values[:, 0].max() + 1, 200)
    body_mass = np.linspace(X_values[:, 1].min() - 200, X_values[:, 1].max() + 200, 200)
    depth_grid, mass_grid = np.meshgrid(bill_depth, body_mass)
    grid = np.column_stack([depth_grid.ravel(), mass_grid.ravel()])
    predicted_class = fitted_model.predict(grid).reshape(depth_grid.shape)

    plt.figure(figsize=(9, 4))
    plt.contourf(
        depth_grid,
        mass_grid,
        predicted_class,
        levels=[-0.5, 0.5, 1.5],
        colors=[not_gentoo_color, gentoo_color],
        alpha=0.3
    )
    plt.scatter(
        X_values[y_values == 1, 0],
        X_values[y_values == 1, 1],
        color=gentoo_color,
        edgecolors='k',
        label='Gentoo'
    )
    plt.scatter(
        X_values[y_values == 0, 0],
        X_values[y_values == 0, 1],
        color=not_gentoo_color,
        edgecolors='k',
        label='Not Gentoo'
    )
    plt.xlabel('Bill Depth (mm)')
    plt.ylabel('Body Mass (g)')
    plt.title('Logistic Regression Decision Regions')
    plt.legend()
    plt.show()

plot_penguin_decision_boundary(
    penguin_two_X_train,
    penguin_two_y_train,
    penguin_two_model
)
Code
plot_penguin_decision_boundary(
    penguin_two_X_train,
    penguin_two_y_train,
    penguin_two_model
)

Logistic regression (two attributes)

Code
plot_penguin_decision_boundary(
    penguin_two_X_train,
    penguin_two_y_train,
    penguin_two_model
)

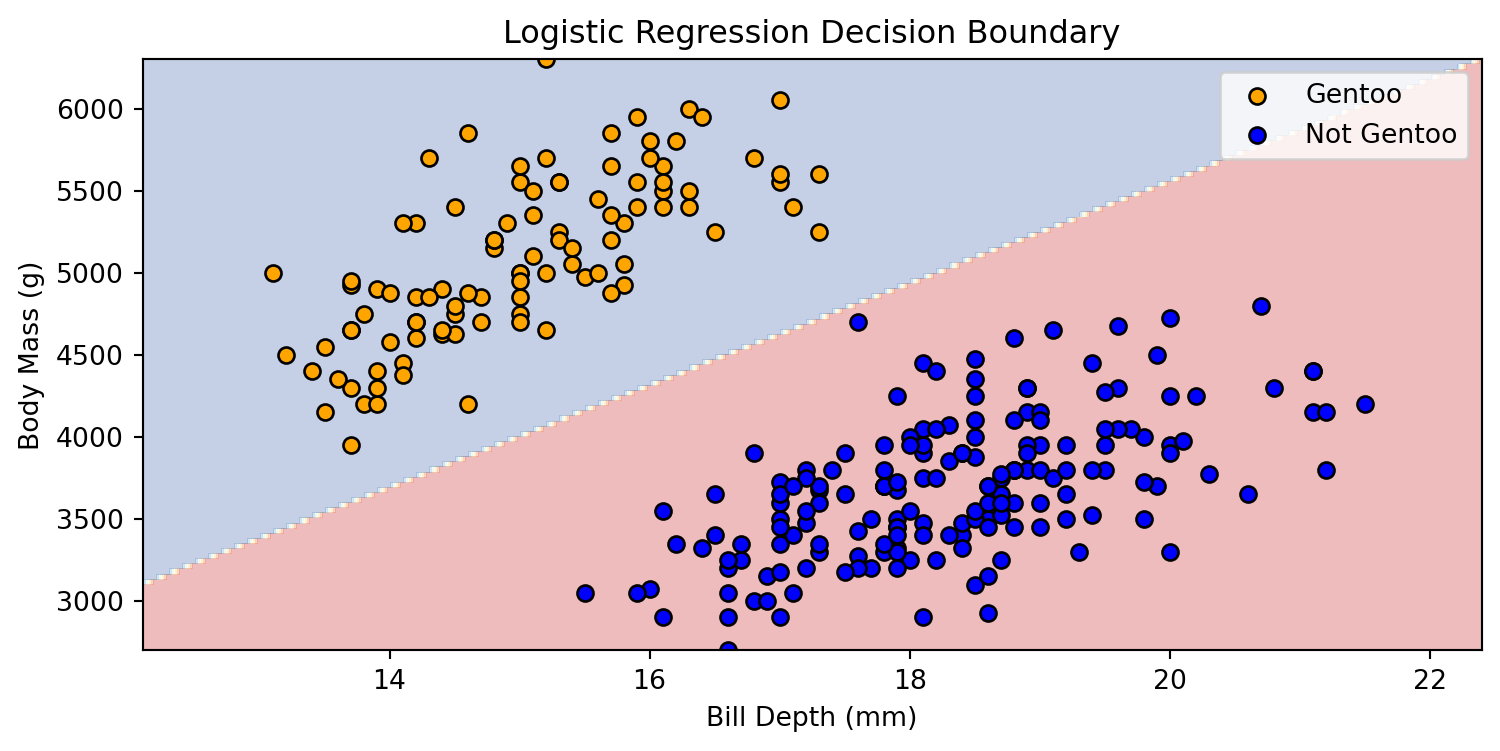
h_\theta(x_i) = \sigma(\theta^\top x_i)

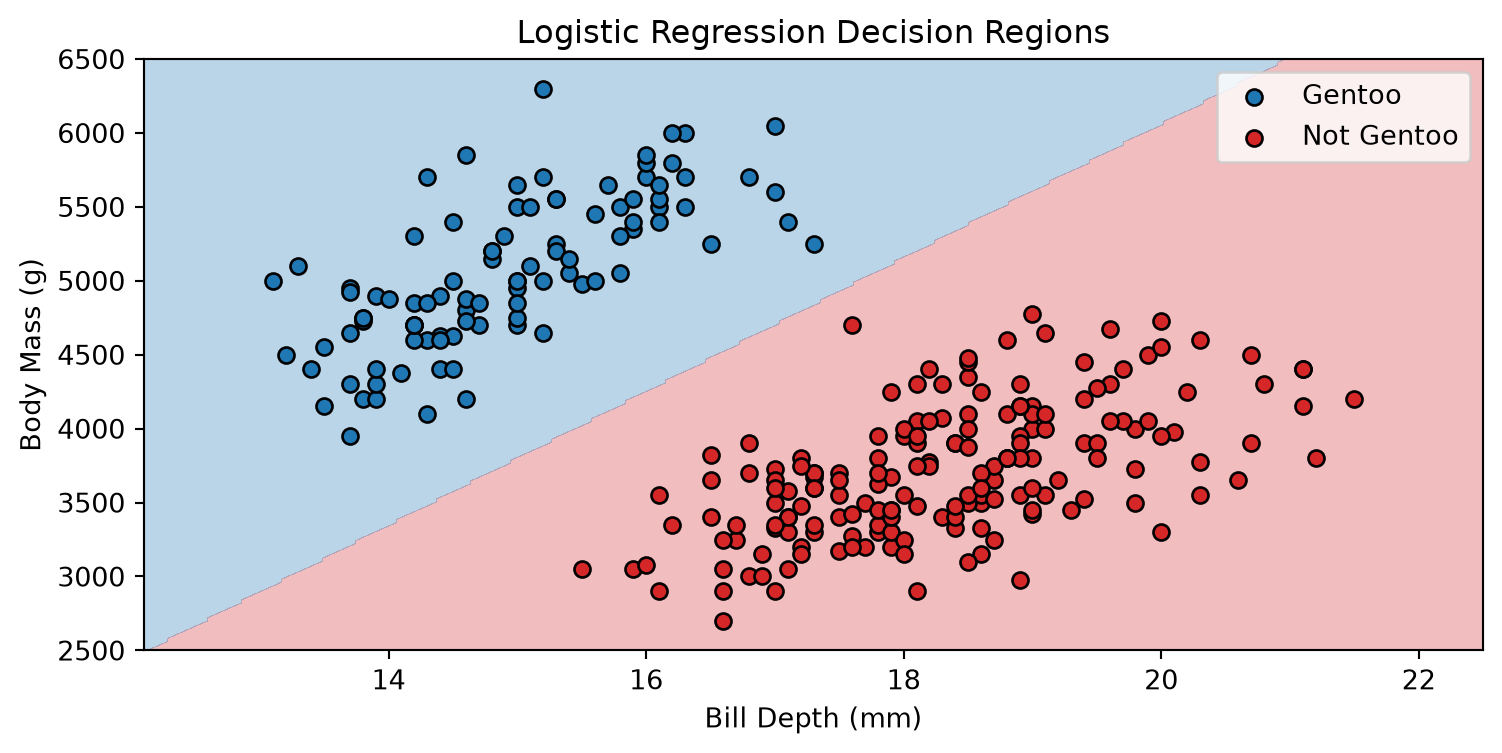
  • The sign of \theta^\top x_i determines which side of the decision boundary contains the example.
  • As the score becomes more positive or more negative, the model probability moves farther from 0.5.
  • On the decision boundary, \theta^\top x_i=0 and the model assigns probability 0.5 to each class.

Logistic regression

  • The Logistic Regression model, in its vectorized form, is defined as:

    h_\theta(x_i) = \sigma(\theta^\top x_i) = \frac{1}{1+e^{-\theta^\top x_i}}

  • Predictions are made as follows:

    • \hat{y}_i = 0, if h_\theta(x_i) < 0.5, equivalently \theta^\top x_i < 0
    • \hat{y}_i = 1, if h_\theta(x_i) \geq 0.5, equivalently \theta^\top x_i \geq 0
  • The parameters \theta are learned by minimizing a loss function. The next lecture derives this loss and applies gradient descent.

Digits example

1989 Yann LeCun

Handwritten Digit Recognition

Aims:

  • Developing a logistic regression model for the recognition of handwritten digits.

  • Visualize the insights and patterns the model has acquired.

UCI ML hand-written digits datasets

Loading the dataset

digits = load_digits()

What is the type of digits.data

type(digits.data)
numpy.ndarray

UCI ML hand-written digits datasets

How many examples (N) and how many attributes (D)?

digits.data.shape
(1797, 64)

Assigning N and D

digit_count, digit_feature_count = digits.data.shape

target has the same number of entries (examples) as data?

digits.target.shape
(1797,)

UCI ML hand-written digits datasets

What are the width and height of those images?

digits.images.shape
(1797, 8, 8)

Assigning height and width

_, digit_height, digit_width = digits.images.shape

UCI ML hand-written digits datasets

Assigning digits_X and digits_y

digits_X = digits.data
digits_y = digits.target

UCI ML hand-written digits datasets

digits_X[0] is a vector of size digit_height * digit_width = D (8 \times 8 = 64).

digits_X[0]
array([ 0.,  0.,  5., 13.,  9.,  1.,  0.,  0.,  0.,  0., 13., 15., 10.,
       15.,  5.,  0.,  0.,  3., 15.,  2.,  0., 11.,  8.,  0.,  0.,  4.,
       12.,  0.,  0.,  8.,  8.,  0.,  0.,  5.,  8.,  0.,  0.,  9.,  8.,
        0.,  0.,  4., 11.,  0.,  1., 12.,  7.,  0.,  0.,  2., 14.,  5.,
       10., 12.,  0.,  0.,  0.,  0.,  6., 13., 10.,  0.,  0.,  0.])

It corresponds to an 8 \times 8 = 64 image.

digits_X[0].reshape(digit_height, digit_width)
array([[ 0.,  0.,  5., 13.,  9.,  1.,  0.,  0.],
       [ 0.,  0., 13., 15., 10., 15.,  5.,  0.],
       [ 0.,  3., 15.,  2.,  0., 11.,  8.,  0.],
       [ 0.,  4., 12.,  0.,  0.,  8.,  8.,  0.],
       [ 0.,  5.,  8.,  0.,  0.,  9.,  8.,  0.],
       [ 0.,  4., 11.,  0.,  1., 12.,  7.,  0.],
       [ 0.,  2., 14.,  5., 10., 12.,  0.,  0.],
       [ 0.,  0.,  6., 13., 10.,  0.,  0.,  0.]])

UCI ML hand-written digits datasets

Plot the first n=5 examples

def plot_digit_examples(X_values, y_values, count=5):
    plt.figure(figsize=(10, 2))
    for index, (image, label) in enumerate(zip(X_values[:count], y_values[:count])):
        plt.subplot(1, count, index + 1)
        plt.imshow(image.reshape(digit_height, digit_width), cmap=plt.cm.gray)
        plt.title(f'y = {label}')
        plt.axis('off')
    plt.show()

plot_digit_examples(digits_X, digits_y)

UCI ML hand-written digits datasets

Code
plot_digit_examples(digits_X, digits_y)

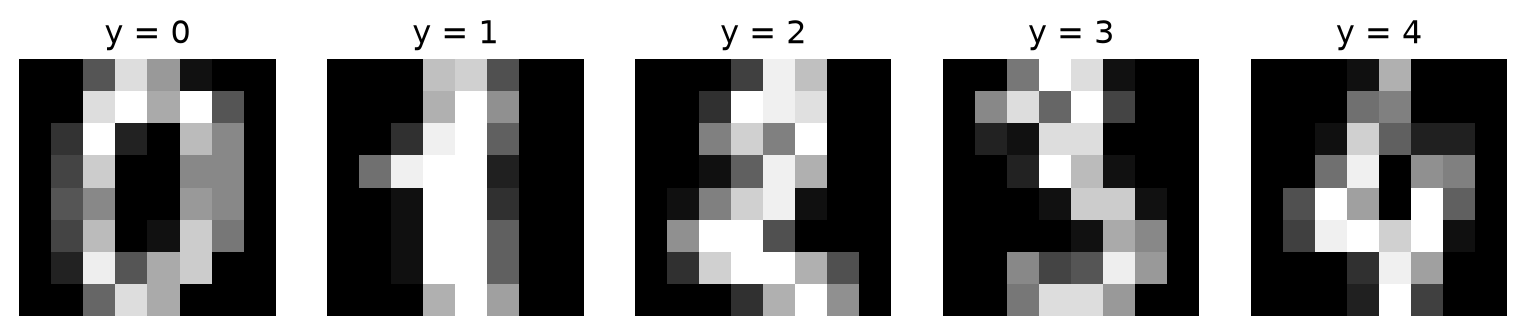
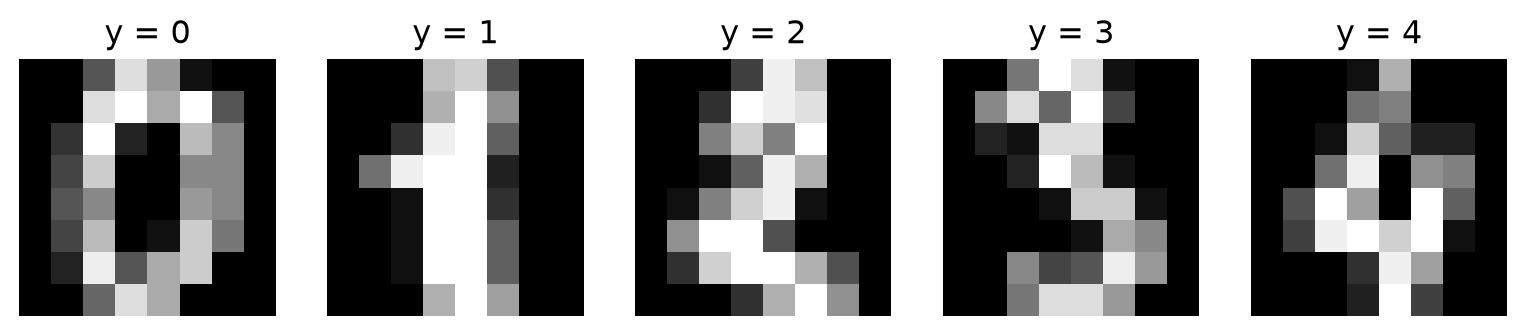
  • In our dataset, each x_i is an attribute vector of size D = 64.

  • This vector is formed by concatenating the rows of an 8 \times 8 image.

  • The reshape function is employed to convert this 64-dimensional vector back into its original 8 \times 8 image format.

UCI ML hand-written digits datasets

Code
plot_digit_examples(digits_X, digits_y)

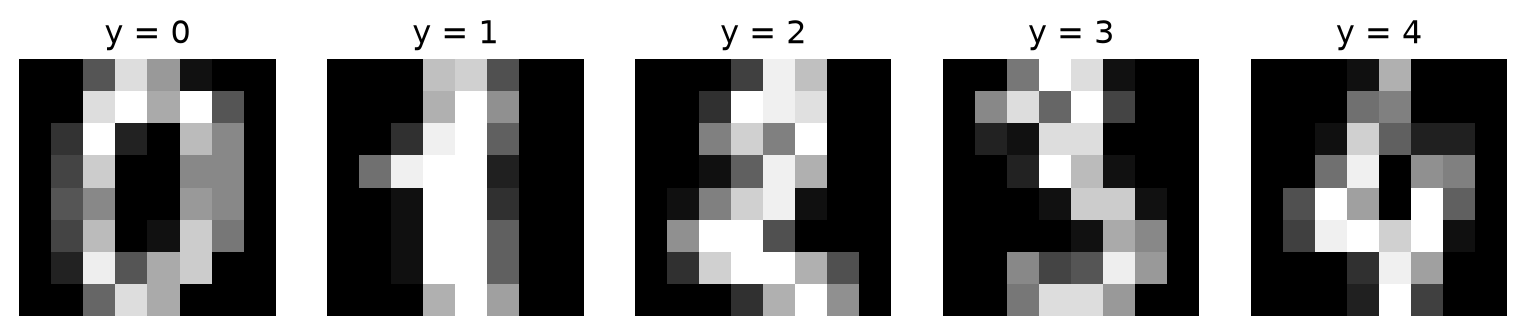
  • We will train 10 classifiers, each corresponding to a specific digit in a one-vs-rest (OvR) approach.

  • Each classifier will determine the optimal values of \theta_j (associated with the pixel features), allowing it to distinguish one digit from all other digits.

UCI ML hand-written digits datasets

Preparing for our machine learning experiment

digits_X_train, digits_X_test, digits_y_train, digits_y_test = train_test_split(
    digits_X,
    digits_y,
    test_size=0.1,
    random_state=42,
    stratify=digits_y
)

UCI ML hand-written digits datasets

Optimization algorithms generally work best when the attributes have similar ranges.

digit_scaler = StandardScaler()
digits_X_train_scaled = digit_scaler.fit_transform(digits_X_train)
digits_X_test_scaled = digit_scaler.transform(digits_X_test)

UCI ML hand-written digits datasets

digit_classifier = OneVsRestClassifier(LogisticRegression(max_iter=1000))
digit_classifier.fit(digits_X_train_scaled, digits_y_train)

UCI ML hand-written digits datasets

Applying the classifier to our test set

digits_y_pred = digit_classifier.predict(digits_X_test_scaled)
digit_test_accuracy = accuracy_score(digits_y_test, digits_y_pred)
print(f'Test accuracy: {digit_test_accuracy:.3f}')
Test accuracy: 0.967

Visualization

How many classes?

digit_classifier.classes_
array([0, 1, 2, 3, 4, 5, 6, 7, 8, 9])

The coefficients and intercepts are in distinct arrays.

(digit_classifier.estimators_[0].coef_.shape,
 digit_classifier.estimators_[0].intercept_.shape)
((1, 64), (1,))

The intercept is \theta_0. The 64 feature coefficients are \theta_j, for j \in \{1,\ldots,64\}.

Visualization

digit_classifier.estimators_[0].coef_[0].round(2).reshape(
    digit_height,
    digit_width
)
array([[ 0.  , -0.14, -0.  ,  0.21, -0.01, -0.66, -0.46, -0.05],
       [ 0.  , -0.22, -0.05,  0.43,  0.57,  0.9 ,  0.02, -0.19],
       [-0.03,  0.28,  0.43, -0.18, -0.94,  0.82,  0.04, -0.13],
       [-0.04,  0.21,  0.11, -0.63, -1.78,  0.09,  0.23, -0.04],
       [ 0.  ,  0.35,  0.5 , -0.6 , -1.73, -0.02,  0.03,  0.  ],
       [-0.15, -0.13,  0.86, -0.97, -0.73,  0.1 ,  0.26,  0.02],
       [-0.07, -0.3 ,  0.44,  0.09,  0.25,  0.05, -0.4 , -0.47],
       [ 0.02, -0.26, -0.43,  0.43, -0.59, -0.08, -0.28, -0.28]])

Visualization

digit_zero_coefficients = digit_classifier.estimators_[0].coef_[0]
plt.imshow(
    digit_zero_coefficients.reshape(digit_height, digit_width),
    cmap=plt.cm.RdBu
)
plt.colorbar()
plt.show()

Visualization

Code
plt.figure(figsize=(10,5))
max_abs_coefficient = max(
    np.abs(estimator.coef_).max()
    for estimator in digit_classifier.estimators_
)

for index, class_label in enumerate(digit_classifier.classes_):
    plt.subplot(2, 5, index + 1)
    plt.title(f'y = {class_label}')
    plt.imshow(
        digit_classifier.estimators_[index].coef_.reshape(
            digit_height,
            digit_width
        ),
        cmap=plt.cm.RdBu,
        vmin=-max_abs_coefficient,
        vmax=max_abs_coefficient
    )
    plt.axis('off')
plt.show()

Prologue

Summary

  • Logistic regression maps the linear score \theta^\top x_i to the probability P(y_i=1\mid x_i,\theta) using the sigmoid function.
  • The threshold h_\theta(x_i)=0.5 corresponds to the linear decision boundary \theta^\top x_i=0.
  • A model probability estimates class membership; it is not the probability that the predicted label is correct.
  • One-vs-rest trains one binary classifier for each class and selects the class with the largest score.
  • Preprocessing must be fitted on the training set and then applied unchanged to the test set.
  • Learned coefficients show how each feature changes a classifier’s linear score.

References

Alharbi, Fadi, and Aleksandar Vakanski. 2023. “Machine Learning Methods for Cancer Classification Using Gene Expression Data: A Review.” Bioengineering 10 (2): 173. https://doi.org/10.3390/bioengineering10020173.
Russell, Stuart, and Peter Norvig. 2020. Artificial Intelligence: A Modern Approach. 4th ed. Pearson. http://aima.cs.berkeley.edu/.
Wu, Qianfan, Adel Boueiz, Alican Bozkurt, et al. 2018. “Deep Learning Methods for Predicting Disease Status Using Genomic Data.” Journal of Biometrics & Biostatistics 9 (5).
Zhao, Celina. 2026. “OpenAI Breakthrough Triggers ‘Existential Crisis’ in Math.” Science, ahead of print, September. https://doi.org/10.1126/science.zbgmw3q.

Resources

Next lecture

  • Negative log-likelihood, geometric interpretation, implementation

Appendix

One-vs-rest classifier

# Load the Iris dataset
iris = load_iris()
iris_X, iris_y = iris.data, iris.target

# Binarize the output
iris_y_binarized = label_binarize(iris_y, classes=[0, 1, 2])

# Split the dataset into training and testing sets
iris_X_train, iris_X_test, iris_y_train, iris_y_test = train_test_split(
    iris_X,
    iris_y_binarized,
    test_size=0.2,
    random_state=42,
    stratify=iris_y
)

One-vs-rest classifier

# Train one binary classifier for each class

iris_classifiers = []
for class_index in range(len(iris.target_names)):
    iris_classifier = LogisticRegression(max_iter=1000)
    iris_classifier.fit(iris_X_train, iris_y_train[:, class_index])
    iris_classifiers.append(iris_classifier)

One-vs-rest classifier

# Predict on a new sample
new_sample = iris_X_test[0].reshape(1, -1)
confidence_scores = np.array([
    classifier.decision_function(new_sample).item()
    for classifier in iris_classifiers
])

# Final assignment
final_class = np.argmax(confidence_scores)

# Printing the result
print(f"Final class assigned: {iris.target_names[final_class]}")
print(f"True class: {iris.target_names[np.argmax(iris_y_test[0])]}")
Final class assigned: setosa
True class: setosa

label_binarize

# Original class labels
example_labels = np.array([0, 1, 2, 0, 1, 2, 1, 0])

# Binarize the labels
example_labels_binarized = label_binarize(example_labels, classes=[0, 1, 2])

print("Binarized labels:\n", example_labels_binarized)

# Convert binarized labels back to the original numerical values
original_labels = [np.argmax(label_vector) for label_vector in example_labels_binarized]
print("Original labels:\n", original_labels)
Binarized labels:
 [[1 0 0]
 [0 1 0]
 [0 0 1]
 [1 0 0]
 [0 1 0]
 [0 0 1]
 [0 1 0]
 [1 0 0]]
Original labels:
 [np.int64(0), np.int64(1), np.int64(2), np.int64(0), np.int64(1), np.int64(2), np.int64(1), np.int64(0)]

Marcel Turcotte

[email protected]

School of Electrical Engineering and Computer Science (EECS)

University of Ottawa